
Visit Tealfeed
CASE STUDY 03

Welcome to Tealfeed!
We’re excited to partner with you on your journey to manage your team and client interactions seamlessly. This guide will walk you through setting up your organizational account, adding team members, configuring payment details, and creating sessions efficiently.
Follow this step-by-step guide to ensure your organization is set up for success and fully equipped to leverage the power of Tealfeed’s features. Let’s dive in!
TABLE OF CONTENTS
Account Setup on Tealfeed
• Visit tealfeed.com/signup.
• Select the Service provider option and click continue.

• Sign up using an email or Google account. Ensure it’s the email you’ll use for calendar sync.
• Dashboard opens automatically post-signup.

📝
Note : Inform the Tealfeed team to convert the account to an organization for further steps.
Profile Setup
Now that your account has been successfully converted into an organization, it's time to set up your profile.
• Navigate to the top-right dropdown menu > Edit Profile.
• Add details like Profile Picture, Full Name, and Phone Number (essential for WhatsApp reminders).

Setting Up Payment Information
Ensure smooth payment processing for your organization by connecting one dedicated bank account for the entire organization.
Navigate to the Admin Panel on the left panel.
Go to "Org Settings" and click on "Connect Bank Accounts."
Enter accurate payment details, confirm, and save to finalize.

Invite Team Members
• Go to Admin Panel > Team Members > Invite Member
• Add the email and assign relevant roles.

Joining Organization
• Team members receive email invites.
• Sign up using the same email and join the organization via the dashboard.
• Click on Join org and your free trial will automatically get started.• Add the email and assign relevant roles.
Availability Settings
Now, as an admin, you can set availability either for yourself or for any team member in your organization.
How to Set Availability for Team Members
On the left side panel, at the top, head to dropdown “View Tealfeed as” > Select member
Once you’re in their dashboard, you can follow the same steps outlined below to set availability, just as you would for your own account:
• Go to Availability Settings in the sidebar.

• General Settings

• Select your time zone for you or your clients.
• Define a minimum notice duration for bookings (e.g., 120 minutes or 1–2 days).
• With future availability, control how far ahead clients can book appointments
Custom Schedules
Create one or more custom schedules based on the days and time slots when you’d want to accept bookings, tailored to different services or practice modes like in-clinic or virtual sessions.

Integrations
Each member needs to complete this step individually, as the integration connects directly to their Google account.
• Access Integrations in the sidebar.
• Connect Google Calendar and Google Meet by following the prompts presented on the screen.

Services Creation
1-1 Sessions
Admins can schedule sessions for themselves or team members. Create services, clients can book based on availability, and share booking links for seamless scheduling
• Click on the Create New button > 1-1 Connect session.
• Use the Select Seller option to choose any team member (or members) without needing to switch profiles repeatedly, and add session details like name, description, pricing options etc.
• For detailed instructions on creating 1-1 sessions and utilizing all these features, read the full guide here.

One-Off Sessions
Now that your entire team has joined, you can view everyone's real-time availability and calendars in parallelly through unified calendar.
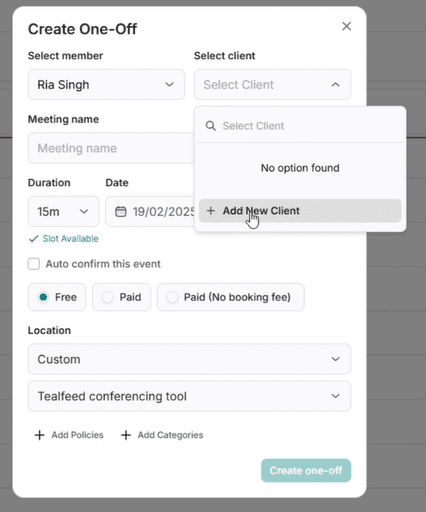
• When a client requirement comes in, simply check the availability of your team members. Identify who has an open slot, select the time, enter the client's details, and book the call seamlessly.

Add or select a client:
• If the client already exists on your Tealfeed profile, select their name.
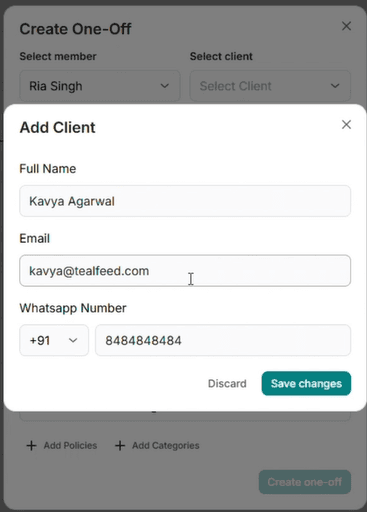
• If the client is new, click Add New Client and add details: Name, Email and Whatsapp
Managing Recurring Sessions and Group Events
If any of your therapists conduct recurring sessions or organize webinars, you can set them up by following these steps:
• Create recurring sessions or group events through the "Event" section or "Create New" button.
• Use the Select Seller option to choose the team member for whom you want to create recurring sessions or events.
• Add details like title, description, poster (in case of workshops, webinars), duration etc.
• Set recurring frequency (e.g., weekly sessions every Friday).

• Set payment and location preferences as guided under “creating a 1:1 Session”.
• Set attendee limit, send automated invites to new/existing by choosing adding them to "notify clients' or add to "auto-confirm"

Additional Features:
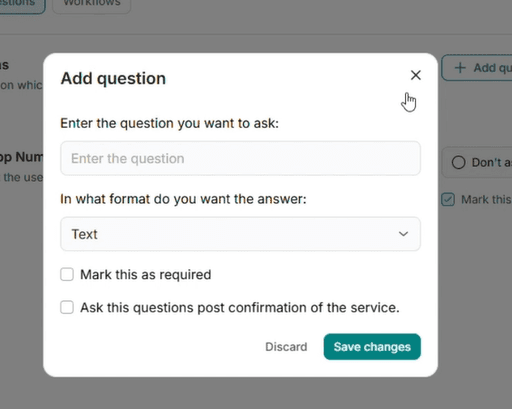
Attach questionnaires to collect important client data and documents.
Customize notifications and notify clients via email/WhatsApp or share event links directly.

Creating and Managing Bundles
Bundle multiple services or sessions for long-term client management.
Steps to Build Your Bundle:
• Go to Create New → Bundle.
• Add a title and select same or different services which you want to bundle (if you have a certain set of services which you want to add to the bundle, you'll have to first create them)
• Set pricing and bundle validity
• Add cancellation policies and questionnaires.
• Click on save changes and you’re set share the bundle link with clients or book sessions on their behalf.

Booking Bundles on Behalf of Clients:
As an Admin or Therapist, you can book bundles for clients:
• Go to Bundle and view the details of the respective bundle.
• Navigate to Services → Book Now.

• Select the time slot, add client details, and confirm the booking directly.
"If you have any questions or need further assistance, we're here to help! Refer to this guide anytime, and feel free to contact our support team at contact@tealfeed.com for personalized support."

